Overlay Features
Image overlays can be a powerful tool to add value to photo-finish images.
BASICS
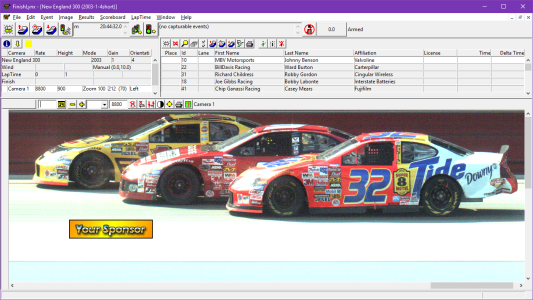
FinishLynx has the ability to overlay graphics on the image as shown in the image below.
This feature can be of great benefit in attracting corporate sponsorship for events or for entire meets. A sponsor’s logo can be overlaid on all images printed from a meet. It is also useful in creating more interesting presentation to in house or simulcast TV productions. With this feature, familiar graphics such as “Photo for Win” or corporate logos can be placed anywhere on the screen.
To be overlaid on the FinishLynx screen, a graphic must be in 24 bit Truevision Targa Format (otherwise known as .TGA).
This format can be written by common graphic manipulation packages such as Adobe PhotoShop. When creating a graphic to overlay, it should be noted that black is treated as a “transparency” color; this means that any part of the graphic that is black will show through to the background when it is placed over the FinishLynx image. The black will, however show on printed images.
To overlay a graphic on an image, use the cross hair of the hash line to locate the center of the graphic and then open the Image menu. Select Overlay and the list of available graphics files will appear. Clicking on one of the files will cause it to appear on the screen.
You can make your graphic overlay repeat horizontally across the entire FinishLynx image. Whether an overlay is displayed once or repeated across the screen is determined by its file extension. If an overlay file ends in .RGx (instead of .TGx), it is repeated across the entire screen and on image printouts. Select and remove overlays as you did before. If you want to use the overlay both singly and repeating across the screen, make two copies of the graphic and save one as .RGx and the other as .TGx.
You can add new text overlays to an image by following these steps:
- Click an area on the image where you want the overlay placed.
- Click Image from the menu bar and select Overlay.
- Select one of the following options from the sub-menu:
- Text: is blank at first, but remembers the last text you entered.
- Closest time: fills in the time of the closest competitor in the image.
- Event name: fills in the name of the event. It is displayed at the top and centered when in full screen mode (CTRL-F).
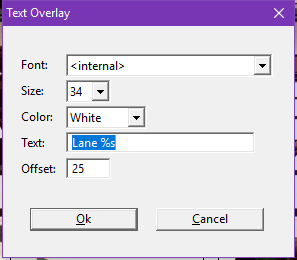
- A dialog appears from which you can select the font, size, and face color, as well as the exact text to display.
- Click Ok.
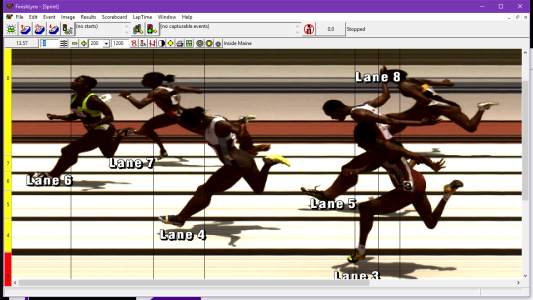
There is an image overlay function that allows you to place text overlays in each evaluated lane next to the object in that lane. Below is an example of a FinishLynx image using this new text overlay.
- To use the Lanes... overlay function:
- Click Image from the Menu Bar and select Overlay from the drop-down list. Then, select Text.... The Text Overlay dialog appears.
- In the Text: field, add any text you want before or after the %s to customize it. Lane %s produces Lane 1, Lane 2, and so forth.
- In the Offset: text field, type a value to control how far away horizontally from the object you want the overlay placed. Otherwise, the overlay is centered vertically within the lane. The offset indicates how far away the center, not the edge, of the overlay is from the object.
The Hash Time overlay is a text overlay whose value is automatically updated with the current hash time.
- To access the Hash Time overlay:
- With a FinishLynx image open, click Image from the Menu Bar and then select Overlay | Hash time... A Text Overlay combination box appears allowing you to change the font, size, color, and text of the hash time overlay.
- The overlay will update as the hash line is moved in the image pane.
You can label the lines in the EtherLynx
- To turn on line labels:
- Click to select the image where line labels should appear
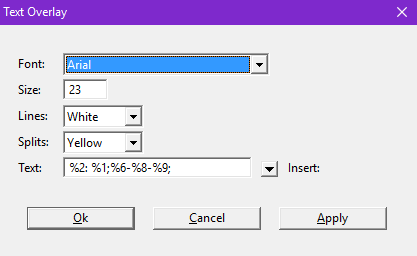
- Click Image | Overlay | Lines Labels... The Text Overlay dialog appears
- Choose the Font:, Size:, Lines: and Splits: colors.
- Set the Text: by entering the relevant variables
- The Insert: pop-up menu lists all of the field codes and the line break character. Selecting one of these will insert it into the text field at the current cursor position.
- The Apply button saves the current settings and redraws all image areas for verification before closing the Text Overlay dialog.
- Click Ok.
Control the position of the last added image overlay by using the UP, DOWN, LEFT & RIGHT arrows keys.
You can retain the overlay setup of your IdentiLynx camera so that it will appear in the next event that you create or load.
- To retain the overlay setup:
- Create an overlay or overlays.
- Click Image from the Menu Bar, and then click Retain overlays from the drop-down list.
- To clear the retained overlays:
- Click Image | Retain overlays again, and the check mark disappears.
- When an event is loaded or created, the retained overlays are automatically added. You can remove these overlays and/or add more overlays without affecting the retained overlays.
Once they have been added to the image, it is possible to easily remove all overlays.
- To remove all overlays:
- Click to select the image pane with overlays to remove.
- Click Image | Remove Overlays, or use the keyboard shortcut CTRL-R.
- Overlays in the selected image pane are removed.
Use the Edit | Undo command to remove the last added image overlay.
ADVANCED MANAGEMENT
If you use a large number of overlay images (some have over 100!), you can be organize them in the Image|Overlay menu hierarchy. You can group images into submenus, set the order in which they appear, enable the repeat function and define shortcuts, all by using optional parameters at the beginning of the filename.
This option starts and ends with a "#" (number sign) in the filename, in between which you can enter parameters:
- Gn: Set the group number (n = group number)
- Pn: Set the position within the group (n = position/order number).
- R: Make this overlay a "repeating" image.
- S: Get the menu item's shortcut key from the filename
You can create up to 10 groups (Gn = 0-9) and each group can contain up to 100 overlays (Pn = 0-99). Assigning images to groups 1-8 will create a "Group #" submenu item to easily find the relevant images. The order of the images in a group, the repeat function and the shortcut to quickly display an overlay image can also be configured by adding optional parameters to the beginning of the file name.
To define your own shortcuts to display an overlay, first set the "S" parameter between number signs followed by a comma and the shortcut key definition. By default, the position values 0-9 assign that item the corresponding Ctrl + n shortcut key. This will happen even if another item (in another group) is already using that key. In such a case, the first one found will be displayed. To prevent this from happening you can add the "S" option to get the shortcut from the filename, even if the filename does not contain a shortcut.
1 Group
- #P1#Win.tga
- #P2#Place.tga
- #P3#Show.tga
- Logo1.tga
- Logo2.tga
- #R#LogoRepeat.tga
2 Groups
- #G1P1#Win.tga
- #G1P2#Place.tga
- #G1P3#Show.tga
- #G2P1S#Logo1.tga
- #G2P2S#Logo2.tga
- #G2P3SR#LogoRepeat.tga
2 Groups - Shortcuts for all
- #G1P1#Win.tga
- #G1P2#Place.tga
- #G1P3#Show.tga
- #G2P1S#Logo1,F1.tga
- #G2P2S#Logo2,F2.tga
- #G2P3SR#LogoRepeat,F3.tga
Screenshot Example
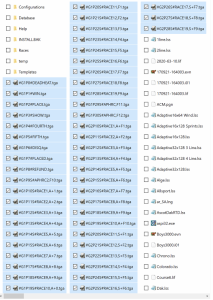
|
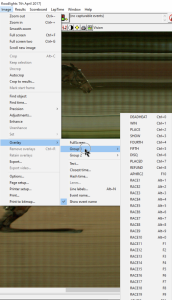
|
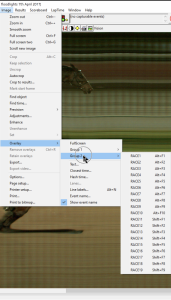
|

