Preparing the Finish Line
Before explaining how to take pictures with your FinishLynx system, it would be as well to make sure that the thing we are going to be taking pictures of - the finish line - looks just how we want it to. This is especially true when you consider that over the course of an average meet, the camera will take over 100,000 pictures of the finish line.
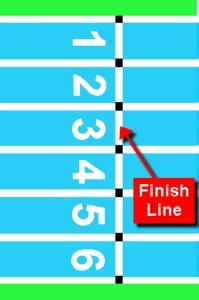
The way it should look is depicted in The Finish Line. The most critical items, which many tracks do not provide, are the black squares at the points where the lane lines cross the finish line. It is also very helpful to have a finish line which is not so worn out that the track beneath it shows through. Lane 1 can be especially bad in this respect.
Before timing a big event, we strongly suggest repainting the finish line white and the little squares black with flat paint. As a last resort, tape can work, but be careful not to use plastic tape with a reflective finish for the black boxes, as it can actually appear white in bright sunlight.
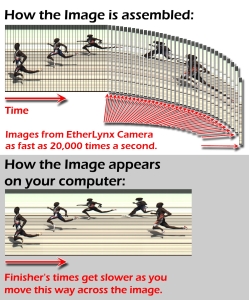
You may be wondering, “Why are the little black squares on the finish line so important?" This may become clearer if you consider the diagram below.
In this image you will notice that the background is essentially white, and the lane markers are black.
Why? you may be wondering. Surely most tracks are dark, with white lane lines?
If you remember that a FinishLynx image is comprised of many pictures of the finish line assembled side by side, you will realize that the background behind the competitors is the finish line - repeated over and over again, many thousands of times. In this resulting image, the black squares on the line become stripes, and the white finish line becomes a white background.
It is worth thinking about this idea for a few moments until you are clear about it because aligning the camera is much easier if you are clear about this concept of the finish line being “everywhere” in a FinishLynx picture.


