Testing & Preparation
At this stage, the EtherLynx camera is mounted, connected and aligned. Now is the time to test
Create a New Event by clicking on the icon, by clicking File | New, or by using the key shortcut CTRL-N.
New Event Icon
![]()
A new Event Window will open and the name format [date-time] will appear in the Open Event listing of the Menu Bar as shown below.
The system is now ready to accept the next start signal and begin running the timer so that when results are read they will show fully automatic times.
It is also ready to begin capturing image.
If you wish, you can change the name of the event from [date-time]. To do this, click on the Save option in the File drop-down menu and type in the name of the event in the File Name: space in the file browser. The new name you have entered will appear on the Menu Bar at the top of the window and in the open event list.
It is important to test the Start Sensor at each new starting line. For instance, when the starter moves to the 200 start, be sure to communicate with him or her to test the gun with the timing system before the athletes are in the blocks. This will not only save time, but also much stress on the part of the athletes, officials, and spectators.
In the case of the Start Sensor, simply have the starter blow sharply into the sensor to test it, or clap their hands together to simulate the firing of the gun. A new start time should appear in the list of start signals.
Go to Manage Starts for additional information.
If you have tested the Start Sensor, or received a false start, you will need to reset the Start Sensor by re-arming the Event. To do this, click on the Add Next Start icon shown below, or click Event | Arm, or use the keyboard shortcut CTRL-A.
Go to Manage Starts for additional information.
Add Next Start Icon
![]()
Press the Capture Button. If image does not appear on the screen when the Capture Button is pressed and the Inactive Capture Button Icon is visible  , the capture button needs to be activated for this event.
To activate the button, make sure that the window you wish to capture image into is at the front, and click on the icon shown in Inactive Capture Button Icon. The button is inactive when it has a red overlay on the button image. Clicking on the icon will remove the red overlay and activate the button ![]() .
.
Go to Manage Starts for additional information.
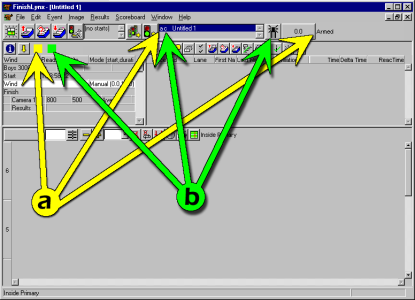
- Armed Indicators: yellow square, letter “a”, “Armed”.
- Capture Enabled Indicators: green square, letter “c”, button icon.
If you can receive a start and capture image, start a race and Record Data.


