
MYLAPS
FinishLynx is capable of receiving data from various MYLAPS applications using the LapTime (LT) Plug-in:
- MYLAPS Timing & Scoring (BibTag and ProChip)
- MYLAPS X2 Adapter (X2 System)
MYLAPS Timing & Scoring
- Start FinishLynx.
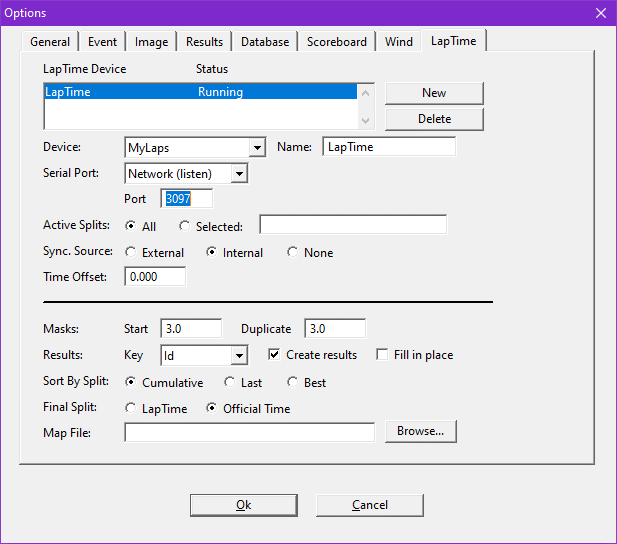
- Go to File | Options... | LapTime tab.
- Click New to create a new LapTime device.
- Go to File | Options... | Results tab.
- Scroll through the fields and enable the following:
- Cumulative Split Time
- Last Split Time
- Laps
- Go to File | Options... | Image tab.
- Select a color for Show Lines: Splits.
- Click Ok to close the Options dialog.
- Optional Settings
- Hold Ctrl+Shift and go to File|Options… to open the Other (Hidden) Settings.
- Expand +LapTime.
- FillInTime: set value: 2 to have the laptimes fill the Time field on the last lap, even if an EtherLynx camera is used.
- IdMaxSize: for BibTags, set to 5 to remove the Group ID from tag encoding.
- IdStripZeros: for BibTags, set to 1 (on) to remove leading zeros from tag encoding.
- TotalLaps: set to total number splits (1 for single finish decoder). Can be changed in Information Zone of each event.
- IntSyncMask: for BibTags, set to 2 (guns) if camera is not synced to GPS.

- Login to the MYLAPS Partner Portal. Check your email to reset your password.
- Click on Support.
- Scroll down and click on Timing & Scoring.
- Click to Download Timing #.#.# and Timing and Scoring manual.
- Install MYLAPS Timing.
- Double-click the Timing 64 shortcut.
- Login in using your MYLAPSPortal credentials.
- Select Start a new event and click Ok. (Optional - Enter the Event name: and Start date)
- Go to File|Preferences… and find the Usage and Sync box. Check the box to Create an “Allow all tags” import rule by default and click Ok.
- Click the Add device button, select your decoder, and click Assign. (Optional – Enter a location name)
- Click the
 icon on to the decoder line and select Load all data (Start from the beginning).
 - Click the Play button on File 1.
- Click the
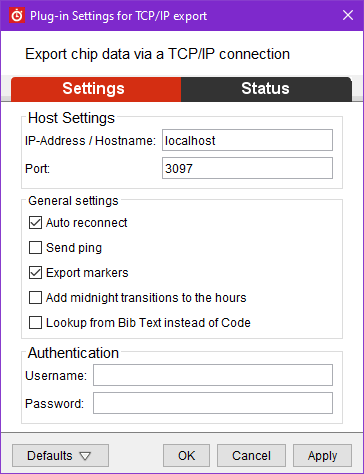
- Click the Add Exporter button and select TCP/IP Export.
- Click the cog wheel to configure the TCP/IP Export.
- Note: If Timing & Scoring is running on a different PC, enter the IP-Address of the FinishLynx PC.
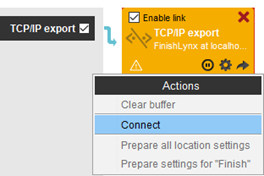
- Check the TCP/IP export box on the location banner.
- Click the arrow and Connect.
Check the Status Bar in FinishLynx for the connectivity status with each LapTime device. It will either show NOT CONNECTED or Received #. If Received # appears, FinishLynx was able to connect to the specified port.
EtherLynx cameras with Internal GPS (recommended):
To sync a MYLAPS decoder with your EtherLynxcamera when both devices are synced to GPS time, set the LapTime|Options… Sync. Source = None.
Learn how to synchronize clock to GPS, to sync a MYLAPS BibTag decoder to GPS time,
Learn HOW TO USE THE INTERNAL GPS? to sync an EtherLynx camera with Internal GPS.
EtherLynx cameras without Internal GPS:
To sync the MYLAPS decoder with your EtherLynx cameras when the camera is not synced with Internal GPS (option), press the Gunshot button on the decoder while FinishLynx is running.
For remote split locations using BibTag decoders equipped with a SIM card and cellular network connectivity, enable the CCNet Server.
- Go to File|Preferences|CCNet.
- Check the box to Enable CCNetSErver.
- Enter your username and password - send email request to info.americas@mylaps.com
- Click Register Devices on Server…
- Click Ok.
BASIC CONFIGURATION
- Connect the BibTag decoder to AC power.
- Turn on the BibTag decoder (press the red power button).
- Use the Select
 and Scroll
  buttons to navigate the menus.
 - Navigate to Communication > Network and set:
- Automatic = OFF
- IP Address = 192.168.0.151 (IP of decoder must be on the same subnet as FinishLynx PC)
- Navigate to General > Clock and set:
- Time Zone = your time zone
- Daylight Savings = ON/OFF
- Connect the BibTag decoder to your EasyMat or SideAntennas.
- Connect the BibTag decoder to the FinishLynx network switch. The BibTag decoder is now ready to be added in Timing & Scoring.
ALTERNATIVE (ADVANCED) CONFIGURATION
- Install the SIM card in the MYLAPS GPS Modem – follow the instructions in the BibTag Timing System Manual
- Turn on the BibTag decoder (press the red power button).
- Use the Select and Scroll buttons to navigate the menus.
- Navigate to Communication > Server Communication and select GMS.
MULTI-CAMERA SYSTEM (TRIAD)
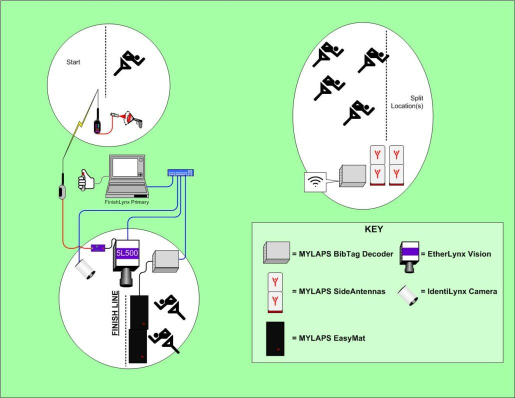
SINGLE CAMERA SYSTEM
