Advanced Evaluation Functions
Rapid Evaluation using lanes is a feature that can speed up the evaluation process of races where competitors finish in an assigned lane.
The first step in setting up the automatic lane read feature is to set the number of lanes and the orientation of numbering. This is done by opening the camera information dialog as detailed in Camera Settings.
The Identify By: option of the Setup Tab should be set to Lanes and the number of lanes should be set in the Lanes field. The default setting for the orientation of the lane numbering is for an in-field camera; that is the numbers start with lane 1 at the bottom of the image and the athletes are traveling from right to left across the image. To reverse this numbering so that lane 1 is at the top of the image (i.e. for an outfield camera), simply switch the setting for Image Orientation in the Camera Settings dialog box. FinishLynx will automatically invert the lane numbering.
If however there is a particular situation which requires that you change the direction the athletes are traveling AND the lane numbering - this most often happens when sprints are run in the reverse direction because of the wind - you can change the numbering of the lanes by clicking on the Reverse lane order check box. The changes will take place when the Enter key is pressed.
In order to lock the lane positions for a given camera set up, set up lane regions at the beginning of the day in the Hardware Control window. To do this, simply drag the tiny arrows on the left of the window one at a time until the lane dividers each align with a lane line.
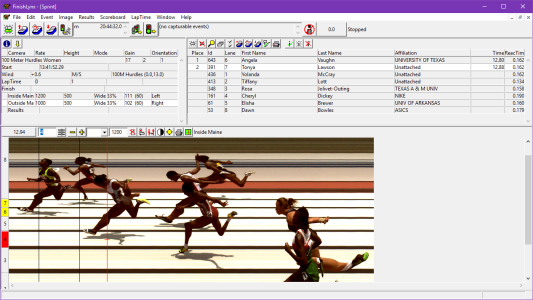
In Lane evaluation mode, the software will match the time and lane number based on the position of the hash line AND the cross hair. When a picture is being read, drag the hash line to the finisher's chest and move the cross hair up or down until it is in the athlete’s lane.
In the example shown below, the cross hair is in Lane 4. The current lane is highlighted in red, and the number of this lane is shown in the ID Box. You will notice that the Lane Bar shows lanes six and seven highlighted in yellow – this means that these lanes have already been evaluated. The red lane is the currently selected one. Gray lanes are neither selected nor evaluated.
All the operator has to do is align the hash line and the cross hair and then press the Enter key: the time for this competitor will be entered in the results field.
If a lane which already has a time is read over again, FinishLynx intercepts and gives the option of writing over the existing time. The “Ok” option should be selected only if the cross hair is placed in a valid lane; the assumption is that a lane had been falsely read earlier. If “Cancel” is selected, the system will do nothing and allow the operator to go back and place the cross hair correctly.
If the operator clicks outside the range of lanes that have been set up, FinishLynx will not enter a time in the Results Zone. This is most often a signal that the cross hair has been misplaced.
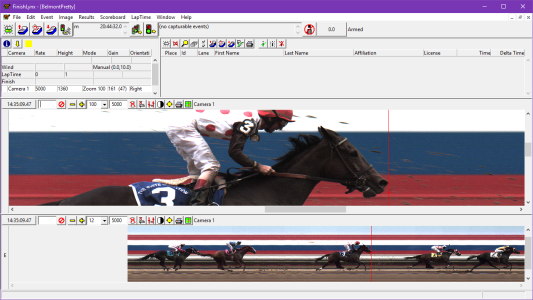
It is possible to show two separate views of the same camera at once on the screen at the same time in separate window “panes”. This can be incredibly useful when you want to be able to show all the finishers of a race in one “pane” and a close up of a group of individual finishers in another. The overall view will help the operator keep track of which competitors have been evaluated and which have still to be done.
An example of this multiple view feature is shown in Multiple views of the Same Camera.
To select the position(s) in which a camera will be displayed, locate the camera you wish to configure in the Information Zone and right-click on the camera name. The following dialog box will be displayed:
Camera Views pop-up menu

To select a position, simply click on it. To deselect a position, click it again.
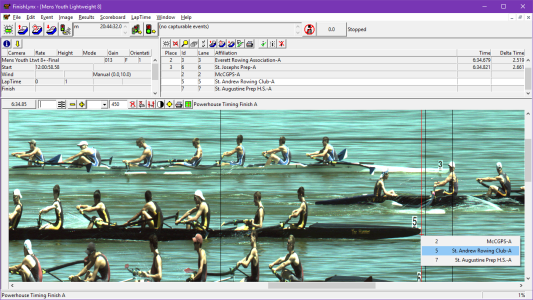
The FinishLynx operator can display the listing of unevaluated competitors from the start list directly on the image so that the operator can easily see the competitors remaining to be evaluated as shown below.
To do this, position the cursor on the desired position, release the left mouse button, then hold down the SHIFT key and left -click the mouse button. A pop-up dialog will appear with a list of all the competitors from the start list for whom times have not yet been entered.
Clicking on a name in this dialog box will automatically enter the competitor's information in the ID box.
The FinishLynx software has a built in keypad that an operator can use to enter athlete identification information in the ID box. To enable the keypad select the Keypad option from the Window drop-down dialog. This will bring up the keypad shown below.
FinishLynx Keypad

To use the keypad, click on the numbers with the mouse. « will clear the last entry. É will enter the information currently in the ID box.


