Start Alignment Mode
FinishLynx offers two modes to align EtherLynx cameras:
- 1-D Align This original alignment mode displays the view of the EtherLynx camera as it will produce photo-finish images, in Line Scan Mode. The Alignment Zone of the Hardware Control window scans through the very thin view of the camera in real-time. It is recommended to use this mode to validate that the alignment is correct, but new users will find the EasyAlign feature to facilitate the process.
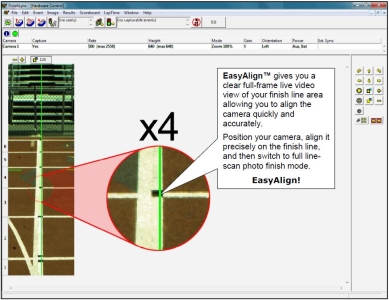
- EasyAlign EtherLynx Vision-Series cameras are able to display a two dimensional (2-D) view of the camera that makes alignment much easier. The goal is to align the green vertical line with the painted finish line and near its front edge.
NOTE: To facilitate the camera alignment when the distance to the computer is great, see HOW TO USE THE Wireless ELECTRONIC VIEWFINDER (Vision PRO X)? available as an option or upgrade on all EtherLynx Vision-Series cameras.
- To start 1-D Line Scan Mode:
- Start FinishLynx.
-
Wait for the EtherLynx camera to load (the green Status Bar in the lower right corner of the screen completes its cycle).
- Click to select the camera to align from the Camera listing.
- Click
 , the 1-D Camera Alignment icons in the top left hand corner of the screen.
- The icon will switch to
 and the Alignment Zone will display the current view of the EtherLynx Vision-Series camera in Line Scan Mode.
TIP: If the image that appears is totally black, check and see if you have remembered to remove the lens cap, if the iris of the lens is shut all the way down (if available, check remote-iris cable and AGC settings) or if the mirror on the Through The Lens Viewer (for cameras with F-mount with viewer) is in the correct position.
NOTE: If you are using two or more cameras, the camera that is highlighted in white in the camera listing on the Hardware Control window is the one that is currently being adjusted. To change cameras, simply click on one of the other cameras in this listing. A sample camera listing is shown below:


- To start EasyAlign 2-D Video Mode:
- Start FinishLynx.
-
Wait for the EtherLynx camera to load (the green Status Bar in the lower right corner of the screen completes its cycle).
- Click to select the camera to align from the Camera listing.
- Click
 , the 2-D Camera Alignment icons in the top left hand corner of the screen.
- The icon will switch to
 and the Alignment Zone will display the current view of the EtherLynx Vision-Series camera in 2-D video mode.
TIP: If the image that appears is totally black, check and see if you have remembered to remove the lens cap, or to see if the iris of the lens is shut all the way down.
NOTE: If you are using two or more cameras, the camera that is highlighted in white in the camera listing on the Hardware Control window is the one that is currently being adjusted. To change cameras, simply click on one of the other cameras in this listing. A sample camera listing is shown below:


Depending on the resolution of the computer screen and the height of the image, the full view of the image may not be visible in the Alignment Zone. In addition, it may be desired to increase the size of the image to add precision to the process.
- To adjust the view of the alignment zone:
- Use the scroll bar on the right of the Hardware Control window.
- Click
 to zoom or
  to zoom out.
TIP: Smart Zoom - hold the CTRL key while clicking  or
or  and FinishLynx will automatically adjust the height of the image to fit in the Alignment Zone. Repeating this action will zoom in or out while maintaining the full image visible.

