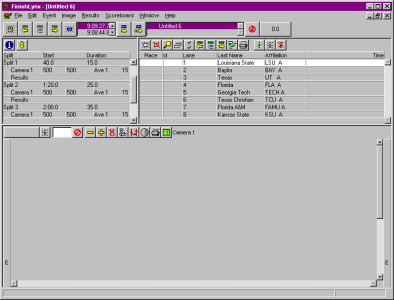
Multiple-Split Interface (MSI) Plug-in
This plug-in will allow the operator to capture multiple ‘finishes’ within a single race. This can either be configured so that a single camera takes multiple pictures at different times, or so that cameras in different locations take pictures at different times during a race (i.e. ¼, ½ , ¾ mile splits in a thoroughbred mile race).
Camera information can be configured for each ‘split location’ and the capture capability can be automatically configured – to capture for a given time at a given moment, or manually switched between capture positions by the FinishLynx operator from within the software.
The software will allow the operator to save and print results for each split of the race which are also included in the LIF.
When MSI is being set up, there is some information that relates specifically to the event about to be timed. This information can be entered after an event has been opened, or a template can be used to create this information automatically. For information on using templates see Templates.
All capturable cameras are available to be used at every split location.
- To add one or more split locations to a FinishLynx event:
- Create a new Event.
- Add split locations as needed.
- Add start list data.
- Configure the Capture options.
- Capture a split location.
- Advance to the next split (repeat step 4 & 5 for each split).
- Evaluate each split locations.
- Save the event.
- The images and results for each split locations are stored with the file and can be reopened as needed.
In FinishLynx, a Split Location is group of cameras configured to capture in an independent Image Zone and produce results in an independent Results Zone.
By default, a new Event always has one split location named "Finish". With MSI, multiple Split Locations can be added to meet the requirements of the sport.
In order to capture image at each split, two capture options must be defined:
- Advance capture.
- Manual Capture is advanced to the Active Split by clicking the Advance capture icon
 , or Event | Advance Capture from the Menu Bar.
 - Timed Capture is advanced to the Active Split by setting the Start and Duration parameters for the selected split.
- Manual Capture is advanced to the Active Split by clicking the Advance capture icon
- Capture method. See Image Capture for details.
Capture Option Combinations
FinishLynx offers 6 different capture combinations.
Manual/Manual
With this setup, the operator should select the Manual capture method, press the capture button to capture image and manually select the Active Split.
Timed/Manual
With this setup, the operator should select the Manual capture method, press the capture button to capture image and FinishLynx will automatically advance the capture function to the Active Split location at the predetermined time after the start.
Manual/ACM
With this setup, the operator should select the Automatic capture method, enable capture for the event and manually select the Active Split.
Capture will take place whenever there is sufficient activity at the finish line to satisfy the requirements of the ACM settings for the Active Split.
Timed/ACM
With this setup, the operator should select the Automatic capture method, enable capture for the event and FinishLynx will automatically advance the capture function to the Active Split location at the predetermined time after the start.
Capture will take place whenever there is sufficient activity at the finish line to satisfy the requirements of the ACM settings for the Active Split.
Manual/Timed
With this setup, the operator should select the Timed capture method and manually select the Active Split.
Fully Automatic
With this setup, the operator should select the Timed capture method and FinishLynx will automatically advance the capture function to the Active Split location at the predetermined time after the start.
Allow Button Override
- This feature can be used with any form of manual capture, whether using a capture button or the keyboard.
- If you are only using one split, we recommend you always have this feature active.
- In one split setups where multiple cameras are using timed capture, this feature allows a manual capture to override a timed capture.
- With multi-split events, you should consider all of the possible event outcomes before deciding to enable this feature.
- To add a camera to a split location:
- Click to select the Split Location in the Information Zone, it will highlight in white.
- Click Event | Add Camera from the Menu Bar and select the desired camera from the sub-menu.
- To delete a camera from a split location:
- Click to select the camera from the Split Location in the Information Zone, it will highlight in white.
- Click Event | Delete Object from the Menu Bar.
- To add start list data in the Results Zone of a split location:
- Use the Schedule icons in the Results Zone.
- To set the times when capture is possible follow the steps below.
- Click on the Split Location in the Information Zone. Two fields are available: Start and Duration.
- In the Start field, enter the time after start when you want capture to be available and then press the Tab key.
- If the Duration field is left blank then capture will be possible in this Split Location up and until capture is advanced to the next Split Location. If a value is entered in the Duration field, then capture will be available for this period of time, or until capture is advanced.


