Remote Control of Camera Position and Lens Settings
FinishLynx provides the option of remote control units for all aspects of positioning the camera and lens function.
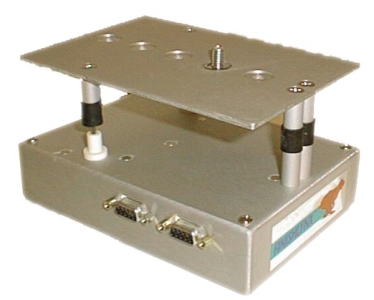
The Remote Positioner is a platform on which the camera is placed which has three degrees of motion controlled by micrometer stepper motors. This not only gives the FinishLynx operator remote control over position, but also allows much finer movement than is possible with a standard tripod head.
Remote control lenses simply have motors that move the iris, focus and/or zoom rings of the lens. There are two types of remote control lenses available:
- Normal These lenses offer all three parameters (iris, focus, zoom) to be controlled by FinishLynx.
- P-Iris These lenses only offer a remote iris function.
FinishLynx should to be configured to communicate with the specified lens type.
- To set the iris type:
- Access the Camera Settings.
- Click on the Setup tab.
- Click to select the appropriate Iris Type:.
- Click Ok.
| Lens | Iris Type |
|---|---|
|
Computar 12.5-75mm |
Normal |
| Computar 8-48mm | Normal |
| Computar 16-160mm | Normal |
| Nikon 24-85mm | Normal |
| Nikon 80-200mm | Normal |
| Computar 2.8-10mm | P-Iris |
| Schneider 8mm | P-Iris |
- Connecting the Remote Positioner Only:
To connect only the remote positioning unit, simply plug one end of the cable included into the back of the camera's Remote Control port and the other end into either one of the connectors on the positioner. The camera is screwed on using the thumbscrew provided through one of the holes in the plate.
- Connecting the Remote Lens Only
To connect only a remote control lens, simply plug the 9-pin connector on the end of the wire coming out of the lens into the port on the camera labeled “Remote Control” has shown in EtherLynx Vision-Series Camera (back view). Note that a remote lens cannot be manually controlled.
- Connecting a Remote Positioner and Lens
To connect both a remote lens and the remote positioning unit, simply plug one end of the cable included into the port on the camera labeled “Remote Control” and shown in EtherLynx Vision-Series Camera (back view), and the other end into either one of the connectors on the positioner. Now plug the end of the cable from the lens into the open connector on the positioning unit.
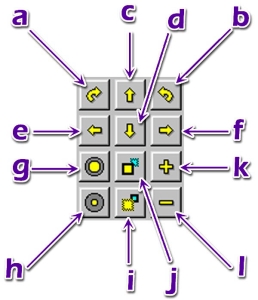
Remote positioners and lenses are controlled by icons in the software; there is no external unit needed. On the right side of the Hardware Control window you will see the control panel shown in Remote Control Icons.
|
Clicking on an icon will cause the positioner to make a very small movement. If the mouse button is held down, continuous movement will start in about half a second and continue for about 2 seconds. If the unit has not moved to the correct point after a few seconds, let go of the mouse button and press it again.
If it never gets to the correct location, it may be necessary to manually adjust the mount to get closer to the needed location. Note that from the time the leading edge of the finish line appears to the time the trailing edge appears can take over 25 clicks on the icon. This allows the camera to be placed extremely accurately on the leading edge of the finish line, and helps when trying to line up two camera systems so both angles read the same time.
When adjusting a remote lens the operator should note that the Icons are incremental not continuous – holding down on a lens adjustment icon will only move the lens to the next position. To keep moving in the same direction, the operator needs to let up on the mouse button and then re-click. This will move to the next position, and so on.
Before trying to align a camera with a remote position, it is good practice to start by centering the remote positioner so that it is set in the middle of the pan/tilt/swivel range.
- To center a remote positioner:
- Select the camera attached to the positioner.
- Click
 in the remote control icons.
 - Look at the percentage of progression shown in the Status bar.


