FinishLynx 10.01
What's New
Vision PRO support
Support is added for the Vision PRO, the newest EtherLynx Vision-Series camera.
- For more information: Vision PRO Datasheet
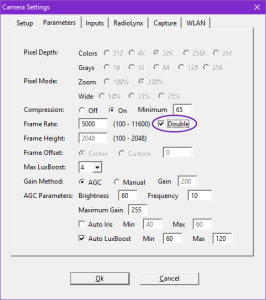
Frame Rate: Double Mode
Double the light - when Double mode is activated, EtherLynx Vision PRO 6K/20K cameras require half the amount of light for the same frame rate.
Double the rate - when Double mode is activated, EtherLynx Vision PRO 20K cameras can capture up to 20,000 frames per second.
- To activate Double mode:
- Click to open the Camera Settings dialog > Parameters tab
- Set Pixel Mode: to Zoom 200%
- Click the Double checkbox
Video Display Module
The Video Display Module (VDM) is available as an option or upgrade on all EtherLynx Vision-Series cameras. VDM allows configurable graphics display of scoreboard data and photo-finish images via the HDMI output on the camera back. Show running time, results or a close finish image on any HDMI compatible device (TV, LED panels, etc...).
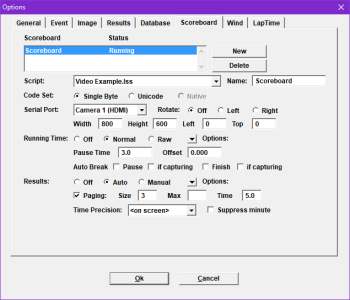
- To send scoreboard data using VDM:
- Connect the EtherLynx Vision-Series camera's HDMI port to a display
- Configure FinishLynx scoreboard settings
- Go to Scoreboard|Options...
- Click New
- Select a VDM compatible script (ie. Video Example.lss)
- Select Serial Port: <Camera Name> (HDMI)
- Set output size {Width/Height} and position {Left (x)/Top (y)} to match the display (default : 192x96 pixels)
- Set Running Time: and Results: preferences
- Click OK
- Restart FinishLynx
- Create a new event or open an existing one to view the output
- To send a photo-finish image to a display using VDM:
- Right-Click the image pane and draw a box around the selection region.
- Click Set Scoreboard Image from the image pop-up.
- Click Scoreboard|Show Image to toggle the image display on and off.
- For more information on how to customize the output style and data:
- Go to C:\Lynx
- Open the Video Example.lss
- Scroll to the Video Display Notes section
Electronic View Finder
The Electronic View Finder (EVF) function is available as an option or upgrade on all EtherLynx Vision-Series cameras. EVF allows an external video display (sold separately) to be connected to the camera's HDMI port for local viewing during alignment. This can greatly facilitate the alignment process of EtherLynx Vision-Series cameras far from the FinishLynx computer.
- To output the alignment view to a video display via the camera's HDMI port:
- Connect the EtherLynx Vision-Series camera's HDMI port to a video display.
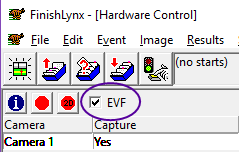
- Check the EVF box on the Hardware Control window in FinishLynx.
- Click the 1D or 2D alignment buttons.
- Use the Zoom buttons (+ -) to zoom in the alignment view.
.
Remote operations:
Alignment mode can also controlled by pressing the A button on the camera back. Each press will cycle through different views - 2D Zoom 100% > 2D Zoom 200% > 2D Zoom 400% > 1D 100%.
- EVF checked + Alignment OFF = VDM Output
- EVF checked + Alignment ON = EVF Output
- EVF unchecked + Alignment ON/OFF = VDM Output
Auto LuxBoost
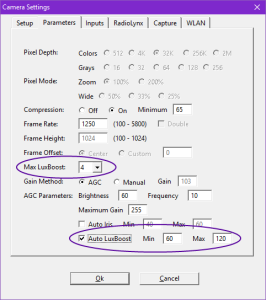
Automatic selection of the LuxBoost setting has been added to maximize the performance of EtherLynx Vision-Series cameras in low light environments. Similar to Auto-Iris Control (AIC), Auto LuxBoost (ALB) extends the capabilities of Auto Gain Control (AGC) by varying the LuxBoost setting based on the current gain value.
With these combined features, the user need only modify the brightness value to control the image exposure under a wide range of light conditions.
- To access LuxBoost settings of a selected EtherLynx Vision-Series camera:
- Click to open the Camera Settings dialog > Parameters tab
- Click to check (default) or uncheck the Auto LuxBoost box
- Set preferred parameters:
- Max LuxBoost: – Highest LuxBoost value to be used.
- Min – Below this gain value, LuxBoost will be lowered.
- Max – Above this gain value, LuxBoost will be increased.
- The max available Frame Rate: is dependent on the Max LuxBoost setting.
- The LuxBoost: label is renamed Max LuxBoost: when ALB is activated.
- ALB will only change the LuxBoost setting when capture and alignment are turned off.
- Available on all EtherLynx Vision-Series. LuxBoost sold separately.
Find Cameras Function
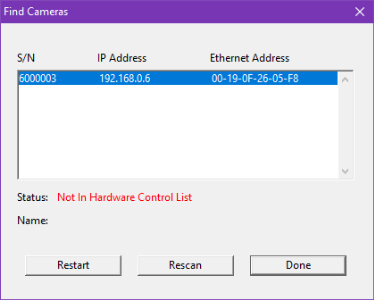
The Find Cameras dialog lists all EtherLynx cameras with a solid boot light found on the network, including some that may not appear in the Hardware Control list. This can happen when multiple network cards are enabled during the boot process (Base IP Error) or lost connectivity on a poor quality network such as Wi-Fi. This is particularly useful for EtherLynx Vision-Series cameras in this state which can be restarted from within FinishLynx.
- To find all cameras:
- Click Help|Find Cameras...
- To restart an EtherLynx Vision-Series camera:
- Click to select a camera
- Click Restart
- Click Ok
- To scan for other cameras:
- Click Rescan
Upgrade Code
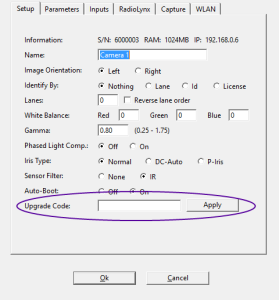
FinishLynx supports upgrading some EtherLynx camera features without having to ship it back to Lynx HQ.
- To upgrade an EtherLynx camera using an upgrade code:
- Contact the Lynx sales team to purchase an EtherLynx camera upgrade.
- Provide the EtherLynx camera's serial number
- Load the EtherLynx camera to be upgraded in FinishLynx.
- Go to the Camera Settings|Setup tab.
- Type or copy the upgrade code.
- Click Apply.
- Click Ok on the "Upgrade code accepted." message.
Advanced: Total Laps
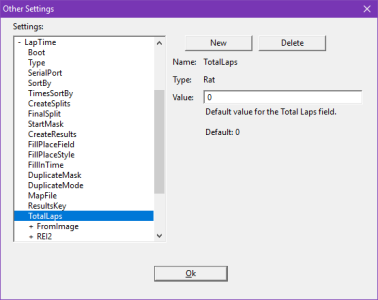
Set the default number of total laps for new events to be used by a LapTime device.
- To change the default value of total laps:
- Access Other Settings
- File|{CTRL-SHIFT}Options
- Go to +LapTime|TotalLaps
- Type the default value for the Total Laps field.
Temperature compensation
Improved image quality with a new sensor temperature compensation for the EtherLynx Vision PRO.

