FinishLynx 11.10
What's New
Scoreboard Improvements
Sticky Use 24-hour format
Once you enable 24-hour format, it will stick after restarting FinishLynx.
Track Live Results Mode
The point of this mode is to follow the most interesting results at any given point of a race. When Track Live Results is enabled, scoreboard paging will skip results that have been previously shown and target new information.
A few examples help illustrate how this works:
- When there is a close result between two competitors, it can take longer than the paging time to evaluate. In the past, paging would jump back to the top of the results and you need to wait through all the pages before seeing the next result. With Track Live Results ON, the scoreboard will skip results that have been previously shown and show the new result as soon as the page time is reached.
- In the case where you have not read a competitor at the top of the order, a page with new information that is above the current page in the order will be shown immediately.
- Combined with Time Trial mode, Track Live Results allows you to show the latest results, even if they are not at the bottom of the order.
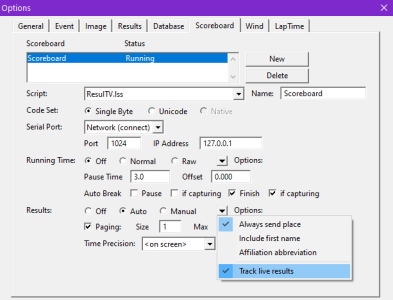
To enable Track Live Results mode:
- Go to Scoreboards|Options...
- Select the scoreboard that should use this feature.
- In the Results: section, click to open Options:.
- Click to select Track live results.
Results Options Improvements
Results|Edit result (F2)
This new option allows you to enter edit mode for the current selection in the Results Zone.
Results|Find ID...
This option now lets you select the search key, so you could also search by Lane or User# field for example. In addition, this function now finds unevaluated result lines and moves the IdentiLynx image if applicable.
Results|Previous/Next Image (Shift-ArUp/Shift-ArDn)
This moves the current results selection up or down by one line and tracks the associated image, if evaluated or has LapTime data.
Results|Previous/Next Split (Shift-ArLt/Shift-ArRt)
This moves the image through the selected participant's split times.
Time Trial (TT) Plug-in Improvements
Duplicate Starts
In Time Trial mode, if FinishLynx detects an existing start for the current start key, it will pop-up a Duplicate Start dialog. When a duplicate start is accepted, the existing start has its key value cleared.
Start Key Updates
When a start key is modified after results have been evaluated, the results update automatically without the need to select the line.
General Improvements
New EVT Event Header Fields
Wind Mode and LapTime Info can now be loaded from the Lynx.evt when creating a new event. Omit or leave the fields blank for the standard behavior.
Event Header Field #12 - Wind Mode
- To set a default mode - use a simple (unquoted) mode string ('Manual', 'Custom', '100M', '200M', '100M Hurdles' or '110M Hurdles').
- To set all Wind parameters - use a quoted field that contains "mode,start,duration".
Event Header Field #13 - LapTime Information
- To set the Total Laps - use a simple (unquoted) total laps value (-1 indicates to blank the field and count up).
- To set all LapTime parameters - use a quoted field that contains "total laps,laps per split,too fast time,too slow time".
Customizable Selection Background Color
Ever find it hard to see which line is currently highlighted? You can now change the background color of the current selection in the Information Zone, Results Zone and Hardware Control window. See the SelectBG advanced settings for details.
LapTime - Create Results Optimization
- LapTime create results always does a Lynx.ppl lookup, even if a start list was initially loaded.
- The Lynx.ppl file is now loaded for better performance at large events where the file can contain many thousands of participants. FinishLynx checks for updates every 2 seconds. This can be controlled with the Database\File\PPLCache advanced settings.
Time Tracking Optimization
The hash line on time tracked images will now default to being centered in the image pane.
Powerful Overlay Management
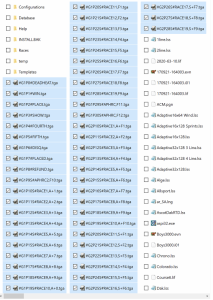
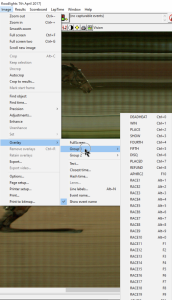
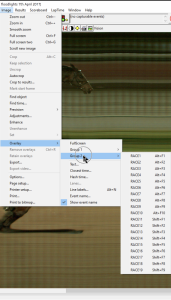
If you use a large number of overlay images (some have over 100!), you'll appreciate this new way to control how they can be organized in the Image|Overlay menu hierarchy. You can group images into submenus, set the order in which they appear, enable the repeat function and define shortcuts, all by using optional parameters at the beginning of the filename.
This option starts and ends with a "#" (number sign) in the filename, in between which you can enter parameters:
- Gn: Set the group number (n = group number)
- Pn: Set the position within the group (n = position/order number).
- R: Make this overlay a "repeating" image.
- S: Get the menu item's shortcut key from the filename
Groups
You can create up to 10 groups (Gn = 0-9) and each group can contain up to 100 overlays (Pn = 0-99). Assigning images to groups 1-8 will create a "Group #" submenu item to easily find the relevant images. The order of the images in a group, the repeat function and the shortcut to quickly display an overlay image can also be configured by adding optional parameters to the beginning of the file name.
Shortcuts
To define your own shortcuts to display an overlay, first set the "S" parameter between number signs followed by a comma and the shortcut key definition. By default, the position values 0-9 assign that item the corresponding Ctrl + n shortcut key. This will happen even if another item (in another group) is already using that key. In such a case, the first one found will be displayed. To prevent this from happening you can add the "S" option to get the shortcut from the filename, even if the filename does not contain a shortcut.
Examples
Legacy Method
- Win.tg1
- Place.tg2
- Show.tg3
- Logo1.tga
- Logo2.tga
- LogoRepeat.rga
Equivalent - Using New Method
- #P1#Win.tga
- #P2#Place.tga
- #P3#Show.tga
- Logo1.tga
- Logo2.tga
- #R#LogoRepeat.tga
2 Groups - Using New Method
- #G1P1#Win.tga
- #G1P2#Place.tga
- #G1P3#Show.tga
- #G2P1S#Logo1.tga
- #G2P2S#Logo2.tga
- #G2P3SR#LogoRepeat.tga
2 Groups - Using New Method with Shortcuts for all
- #G1P1#Win.tga
- #G1P2#Place.tga
- #G1P3#Show.tga
- #G2P1S#Logo1,F1.tga
- #G2P2S#Logo2,F2.tga
- #G2P3SR#LogoRepeat,F3.tga
Screenshot example

|

|

|
Support for Additional Shortcut Keys
The following key identifiers can be used in menu items, just like any other key (F1, F12, A, B, etc.). They must appear exactly as written below, including capitalization:
- PgUp, PgDn, Home, End
- ArLt, ArUp, ArRt, ArDn (Ar = Arrow keys; Lt = left; Rt=right; Dn=down)
- Ins, Del, Tab, Esc, BkSp, and Enter
Support for Additional Items Via Shortcuts
- You can set shortcuts for hidden menu items. You do this by leaving the text field blank and just having the comma followed by the shortcut key.
- You can set shortcuts to move the selected line in the Information Zone. Prev, Next, PageUp, PageDown, Home and End are supported (Strings\MenuBar\Event\).
- You can set shortcuts to scroll the current image pane. ScrlLeft, ScrlRight, ScrlUp, ScrlDown are supported. Scrl is the equivalent of clicking the arrow button in the scroll bar (Strings\MenuBar\Image\).
- You can set shortcuts to page the current image pane. PageLeft, PageRight, PageUp and PageDown are supported. Page is the equivalent to paging in the scroll bar (Strings\MenuBar\Image\).
- You can set shortcuts to go to the beginning or end of the image. Home or End are supported (Strings\MenuBar\Image\).
- You can set shortcuts to the "Move" variants of the three bullets above (ScrlMove, PageMove, Home/EndMove). These variants also move the hash line.
- You can set shortcuts for the Status and Pack Leader pop-up submenus to quickly apply them to the current results line. For example, you could set the following and save time when assigning a large number of DNS/DNF participants:
Strings\Event\Results\Status\Valid:String=Valid,F12
Strings\Event\Results\Status\DidNotStart:String=Did not start,F11
Strings\Event\Results\Status\FalseStart:String=False start,F10
Strings\Event\Results\Status\DidNotFinish:String=Did not finish,F9
- Strings\Event\Results\Status\Disqualified:String=Disqualified,F8
- Strings\Event\Results\Status\Scratched:String=Scratched,F7
- Strings\Event\Results\Status\Advanced:String=Advanced,F6
- Strings\Event\Results\PackLeader:String=Pack leader,F5
TIP: To learn how to create your own customized shortcuts, go to https://www.finishlynx.com/support/finishlynx-keyboard-shortcuts/
Additional Default Shortcuts
| Results Zone | |
|---|---|
| Shift-ArUp | Go up one line and show the relevant image |
| Shift-ArDn | Go down one line and show the relevant image |
| Shift-ArLt | Go to the previous split for the selected participant |
| Shift-ArRt | Go to the next split for the selected participant |
| Shift+PgUp | Page up the results list |
| Shift+PgDn | Page down the results list |
| Shift-Home | Go to the top of results list |
| Shift-End | Go to the bottom of results list |
| Image Zone | |
|---|---|
| PgUp | Page the image left |
| PgDn | Page the image right |
| Home | Go to the beginning of the image |
| End | Go to the end of the image |
| Ctrl-ArLt | Scroll move (image and hash) left |
| Ctrl-ArRt | Scroll move (image and hash) right |
| Ctrl-ArUp | Scroll move (image and hash) up |
| Ctrl-ArDn | Scroll move (image and hash) down |
| Ctrl-Shift-ArLt | Page move (image and hash) left |
| Ctrl-Shift-ArRt | Page move (image and hash) right |
| Ctrl-Shift-ArUp | Page move (image and hash) up |
| Ctrl-Shift-ArDn | Page move (image and hash) down |
| Ctrl-Home | Move image and hash to the beginning |
| Ctrl-End | Move image and hash to the end |
| Ctrl-+/- | Zoom in/out |
ADVANCED - Other Settings
Additional Other (hidden) settings are included:
- Database\File\PPLCache controls a new caching feature. The default (2000) caches the .ppl file, checks for changes every 2 seconds, and reloads it if needed. A value of 0 forces a check every time or disable the feature with a value of -1 to get the legacy behavior.
-
Event\Image\Hash\MoveCenter controls how image is centered when move the hash with the arrow keys. Set it to 50 so the hash never moves and the image slides under it, or to something like 5095050 to "bounce" to the middle when it gets near the edges. Defaults to -1 (old behavior).
-
Event\Image\Hash\TrackCenter controls how image is centered when time tracking. Defaults to 50. Set to -1 for old behavior.
- Event\SelectBG controls the background color of the current selection in the Information Zone.
- Event\Results\SelectBG controls the background color of the current selection in the Results Zone.
- Hardware\Window\SelectBG controls the background color of the current selection in the Hardware Control window.
- Event\Results\ImageCenter controls how image is shown in each pane based on the result's time.
- Legacy behavior (-1) - moves the frame of interest visible at the edge of the window.
- Simple percentage value (0-100; default = 30) - moves the frame of interest with the hash line to that percentage of the way from the beginning (lower time) of the window. The image will scroll every time a new result is requested.
- Percentage with Upper/Lower bounds - moves the frame of interest to the defined percentage, only if it falls outside of the bounds set for the window pane. This can be useful to prevent scrolling when the next frame of interest is close by. The hash line, however, will move every time.
To set the ImageCenter with Upper/Lower bounds, use this formula:
- <ImageCenter_Percentage> + (<UpperBound_Percentage>*1000) + (<LowerBound_Percentage>*1,000,000>)
- Example:
- To move the image so the hash line is in the middle of the screen (<ImageCenter_Percentage> = 50, only if it is not currently shown in the pane (<UpperBound_Percentage> = 100; <LowerBound_Percentage> = 1), set ImageCenter to 1100050 (50 + 100*1000 + 1*1 000 000).
- Scoreboards\<#>\PageMode
- 4 = no unevaluated results after any evaluation - stops tracking unevaluated results that may receive LapTime data after any results have been evaluated. Otherwise continue tracking these results when evaluated results don't require tracking. Requires PageMask=2.
- 8 = no unevaluated results - never track unevaluated results.
- 16 = no evaluated results - once any results have been evaluated, stop tracking altogether.
- 32 = wait for page time - if something changes and it is higher up in the sort order, then always wait for the current page time before paging up. Otherwise, page up immediately.
- 64 = wait only if new info - as above, but only wait if the current page includes new information.
- 128 = page down if not new info - do not wait to page down if the current page did not include new information. Otherwise, paging down always waits for the current page time.
- Scoreboards\<#>\PageMask - "show all results" shows all results all the time. Otherwise, once any results are evaluated, no unevaluated results are shown. This must be selected for PageMode=4 to be meaningful.
- Scoreboards\<#>\PortBuffer - now defaults to 32,767. Previously 4095.

