FinishLynx 7.50 Release Notes
General New Features
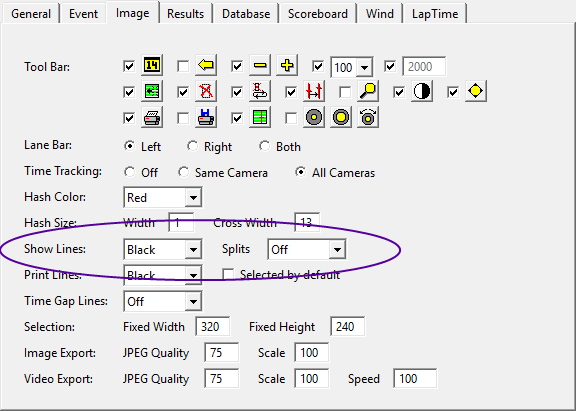
Show Lines and Splits in full screen mode
If enabled, Show Lines and Splits now appera in full screen mode.
- To enable Show lines and Splits:
- Click Image|Options. The Options dialog appears.
- Next to either the Show Lines: or Splits option, click to select the down arrow to display the drop-down list.
- Select a color to enable Show Lines and Splits. Click Ok to exit the dialog.

Enhanced Find Object feature
When you use the Image | Find Object feature, it now finds the first object in the newly added image. When you run Find Object and it fails to find an object because it is at the end of the image, FinishLynx asks if you want to search from the beginning. If you choose No, the default, then the next time you run Find Object, it starts from the last object found.
New Crop to results... feature
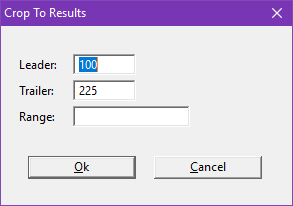
The new Image | Crop to results... feature crops out the entire image except for the image around each result’s evaluated time.
- Clicking Image | Crop to results… makes the following dialog appear:

The Leader: and Trailer: values are how many frames before and after the result's evaluated time are kept in the image.
If the Range: value is left blank, all current results are used.
New Cropped Image Warning
If you try to save an event that has had the Crop to results… or Keep selection features without uncropping the image, a new Cropped Image Warning appears.
New File | Reload feature
When an event is opened in Reader mode, a File | Reload command is enabled. Use this feature to load the latest information that the capture computer has stored in the *.evn file. This feature is useful when you are using Reader mode and Time Trial mode together, because starts typically come in after the Reader mode enabled computer has opened the event.
By clicking File | Reload, you save, close, and reopen the event.
Default Precision value used for stop time
When the on-screen running time is set to stop, the precision used is now the same value that you assign to the Default Precision value.
- To set the Default Precision value:
- Click Results from the Menu bar, and then click Options. The Options dialog appears.
- Click the arrow next to the Default Precision: setting and click to select the value you want to use.
Ability to disable filters
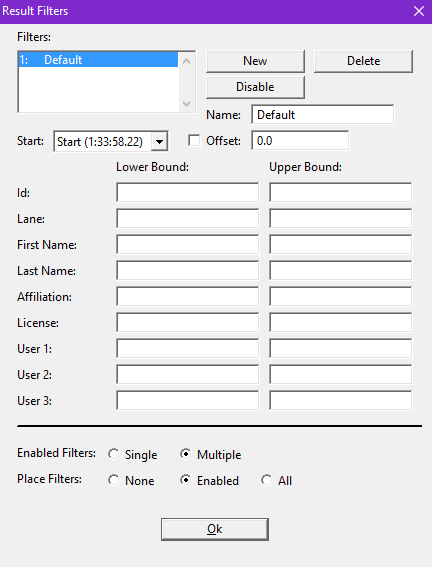
You can now disable filters in the Result Filters dialog.
- To disable filters:
- Click Results from the Menu bar and then click Filters…. The Result Filters dialog appears.

- Disabled filters appear in gray, and enabled filters are in black.
- A button appears next to the filter list that says either Enable or Disable.
- At the bottom of the dialog, there is a new setting for how many filters can be enabled at the same time. The options are Single and Multiple.
- If Single is selected, then whenever a filter is enabled, all other filters are disabled.
- Multiple allows as many filters to be enabled as you like.
Ability to choose which filters are used when calculating place
The new Result Filters dialog allows you to choose which filters are used when calculating the place field.
Click Results | Filters… to make the Results Filters dialog appear. At the bottom of the dialog are three selections.
- Select the Enabled radio button if you want the place field to be assigned based solely on the visible results with regard to the currently enabled filters.
- Select the None radio button to assign places with no filters defined.
- Select the All radio button to assign places with all filters, even the disabled ones, defined.
Shortcut menu for choosing which filters are enabled
- To enable this:
- In the Results area title bar, click on any column that does not already have a shortcut menu. For example, do not click on Time, Delta Time, or Speed, because they already do.
- A menu appears containing the defined filters with check marks next to the enabled filters. Click to select a filter to enable or disable it.
LapTime based place numbers cleared for unread results
When the first official time is read, the LapTime based place numbers are now cleared for all unread results.
New Print feature
Now, when you select Print results with image, you can select which results are included with the printed image.
You can define which results are included using the following methods:
- Comma separated list, such as 1,2,3,
- A bounded range, such as 4-99,
- An unbounded range, such as 4-,
- An unbounded arithmetic series, such as 1,3,…,or
- A bounded arithmetic series, such as 1,3,…15.
Other results definitions:
- If you want to specify which values are not allowed, begin the entire string with a carat, or ^.
- If you want to invert the meaning of a single field, begin the field with a tilde, or ~.
Results definition examples
- Accept 1 through 5:
- 1,2,3,4,5
- 1-5
- 1,2,...5
- Accept 11 and higher:
- 11-
- ^1-10
- Accept all odd values:
- 1,3,...
- ^2,4,...
- Accept all odd values to 15:
- 1,3,...15
- Accept all *but* odd values to 15:
- ^1,3,...15
- Accept 1-5, even values to 20 (except 14), then every third value:
- 1-5,~14,6,8,...20,23,26,...
- Accept all values divisible by 5 except those also divisible by 4:
- ~4,~8,~...,5,10,...
New IdentiLynx Features
Support of IdentiLynx's native ACM
FinishLynx now supports the IdentiLynx camera’s native ACM. A separate capture checkbox appears for IdentiLynx cameras. By checking the box, you can control the trigger, size, and active area in the camera dialog.
- To set the active area:
- Select image in an event.
- Click Image from the Menu bar.
- From the drop-down list, click Set | Object active area.
Frame times available
Now, when you use an IdentiLynx camera without any EtherLynx cameras powered on, you can get frame times.
Also in this configuration, you can create a manual start to see elapsed times in the image, rather than the time of day.
Ability to retain the overlay setup
You can now retain the overlay setup of your IdentiLynx camera so that it will appear in the next event that you create or load.
- To retain the overlay setup:
- Create an overlay or overlays.
- Click Image from the Menu bar, and then click Retain overlays from the drop-down list.
- To clear the retained overlays:
Click Image | Retain overlays again, and the check mark disappears.
When an event is loaded or created, the retained overlays are automatically added. You can remove these overlays and/or add more overlays without affecting the retained overlays.
New EtherLynx Features
Ability to set size and active areas
You can now set the size and active areas in EtherLynx ACM. These settings work the same as the size and area settings for the internal photo eye.
Improved camera booting and timer sync
Multi-NIC systems now enjoy greater camera booting and timer sync capabilities. This means that you can have more than one NIC installed and active, and FinishLynx finds which one has cameras attached to it and properly boots and timer syncs those cameras. FinishLynx does this without having to set a base IP address.
New Scoreboard Features
New scripts
FinishLynx now features the following scoreboard scripts:
- Adaptive16x128.lss, and
- Adaptive16x128Sprints.lss.
To select a new scoreboard script:
- Click Scoreboard | Options... from the Menu bar. The Scoreboard | Options dialog appears.
- Click the New button to activate the Scoreboard settings.
- From the Script: drop-down list, click to select a scoreboard script. FinishLynx automatically populates the settings for that dialog.
- Click Ok.
New armed/running results header
There is a new armed/running results header field in the scoreboard output.
