FinishLynx 10.10
What's New
Vision-Series Camera Firmware
This version of FinishLynx includes a firmware upgrade for Vision (5L500) and Vision PRO (5L600) cameras. The upgrade will be done automatically the first time these cameras are booted when running FinishLynx 10.10 and takes an additional 2-5 minutes per camera. During the upgrade process, never turn off or disconnect the camera.
Internal RadioLynx
Vision-Series cameras now offer the Internal RadioLynx option (contact our sales team for a quote). Instead of connecting the RadioLynx Receiver (DecRadio) to the camera or C-Box, simply connect an antenna directly to the camera back panel.
- To configure the Internal RadioLynx:
- Select a camera with Internal RadioLynx in the Hardware Control window.
- Click
 to access the Camera Settings.
 - Click the RadioLynx tab.
- Click Internal for the Port:.
- Select the Frequency that matches the RadioLynx Transmitter (EncRadio).
Camera Network Selection
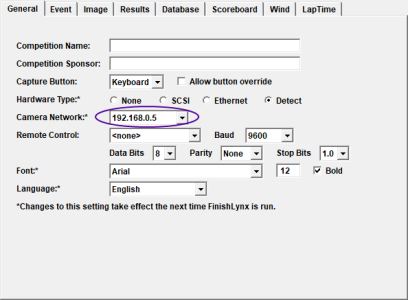
FinishLynx can be configured to exclusively monitor a specific Network Interface Card (NIC) to load cameras. This feature allows users to easily work with a computer that has multiple network cards enabled. By default, FinishLynx will set a NIC with 192.168.0.5 as the camera network.
- To manually select the Camera Network:
- Go to File|Options...
- Click the Camera Network: drop-down of the General tab and select the IP address of the NIC used to connect cameras.
- Click Ok.
- Restart FinishLynx and reboot cameras.
Video Display Module (VDM) Rotation
Support to rotate the VDM output is included in the Scoreboard|Options dialog when a scoreboard object with a VDM script is selected.
Scoreboard Scripts
-
Dak-Extended.lss replaces DakRTDExtended.lss
- Gill_E4982x.lss add to support displaying wind readings on the Gill Countdown Timer.
- Gill 6 Digit.lss has been updated to include a Results section.
- Example2.lss has been updated to include about sections used in Raw vs Normal mode for running time.
ADVANCED - Other Settings
Additional Other settings are included:
- Event\Results\Delta\SkipSame Causes results with the same time to be skipped over when calculating the delta time.
- Hardware\Ethernet\EqualTime now defaults to 100, giving all cameras equal time to transfer image. This allows faster cameras to transfer their image more efficiently when used on the same network as older and slower cameras.
-
Hardware\Ethernet\BindIPAddress allows to specify the NIC used to connect to cameras.
- Hardware\Ethernet\IdentiLynx\CacheSize now defaults to 100MB (100000000 bytes).


