FinishLynx 6.00 Release Notes
This chapter describes new features available in FinishLynx 6.00, since the release of FinishLynx 5.20.
General New Features
Spanish language file
FinishLynx has a new, improved Spanish language file that, when chosen, displays the FinishLynx user interface in Spanish.
- To change FinishLynx to display in another language:
- Click File from the Menu bar and then select Options.... The Options dialog appears.
- From the Language:* drop-down list near the bottom of the dialog, click to select a new language from the list.
- Click Ok.
- Exit and then re-start FinishLynx. FinishLynx displays in the language you selected.

Ability to create a start from an image
FinishLynx now provides you with the ability to create a start from an existing image.
- To do this:
- Click on the image to place a hash line on it and to display the time.
- Click Image from the Menu bar and then select Image start.
- If the current event is capturable, then the start is placed in the main list of starts and can be used like any other start. This includes the ability to place it into a different event.
- If the current event is not capturable, then the start is placed only into the current event.
Source of start indicator
The list of starts now indicates the source of each start, as follows:
- m for manual,
- i for image,
- r for RadioLynx,
- l for LapTime, and
- (blank) for a start that comes from a directly connected sensor.
Ability to disarm an armed event
You can now disarm an armed event.
- To do this:
Click Event from the Menu bar and then select Disarm. The previously armed event becomes disarmed.
Automatic override of manual and timed capture
You can now choose to have automatic override of manual and timed capture modes. Automatic override of timed capture will only function if you have first used button override (see "Allow button override feature") to change from timed to manual capture.
As part of this change, Leader and Trailer now apply to all forms of capture, not just Automatic capture.
Note that manual capture with automatic override is the same as Automatic capture with manual override.
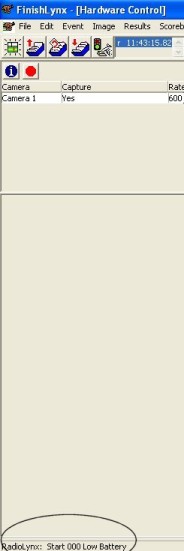
RadioLynx transmitters indicate when low battery
FinishLynx now warns you by displaying a message in the status bar when the RadioLynx transmitters in your competition setup are low. The image here shows the status bar message at the lower left corner of the screen.
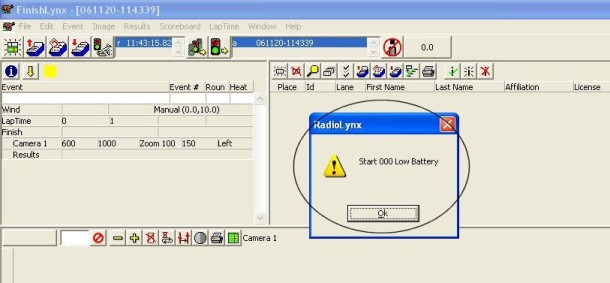
A warning is also displayed when an event is armed if a device has a low battery.
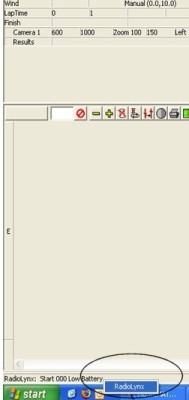
You can also select RadioLynx from the right-click status bar pop-up menu to see the last status message displayed.
Ability to select which photo eyes are active
You can now select which photo eyes are active through a sub-menu in the Scoreboard menu drop-down list.
- To access the photo eye sub-menu:
- Click Scoreboard from the Menu bar and then click to select Photo eyes.
- Click to select which photo eyes in the list you want to deactivate.
Internal FinishLynx Improvements
LIF file enhancements
An event's start time now appears in the header of the LIF file, allowing you to determine what time a race was run or for use as a helpful reference point.
New hidden setting controls PPL file fields
A new hidden setting has been added that controls which fields are filled in from the PPL file when you enter a new Id in the results area.
This means that now when you change an Id number in the results, all of the fields are updated with the changed name.
- To access FinishLynx's "hidden" settings:
- With FinishLynx open, hold down the CTRL and Shift keys on your computer simultaneously while you click File from the Menu bar and select Options.... The Other Settings dialog appears.
- Navigate to the \Event\Results\IdLookup setting. Then, enter one of the following values, depending on how you want FinishLynx to function:
- 0 - do not fill in any fields
- 1 - fill in only empty fields, and
- 2 (the default) - fill in all fields.
- Then, click Ok to save the settings.
- The above instructions describe what happens when you hit Enter when the field is active.
- If you Tab out of the field, no fields are filled in.
- If you would like to have tabbing fill in fields, take the number above that specifies the behavior you want, multiply by 4, and add it to the behavior you want for Enter. For example, if you want tabbing and enter to fill in all fields, take 2 (for Enter) and add 2*4 (for Tab) to get 10. Then, set the IdLookup value to 10.
New file naming format
FinishLynx files are now named according to YYMMDD_HHMMSS, rather than the previous Untitled_x name, allowing files to be stored in a more logical order within a folder.
Printing Image Improvements
Image overlay enhancements
There is a new image overlay function that allows you to place text overlays in each evaluated lane next to the object in that lane. Below is an example of a FinishLynx image using this new text overlay.
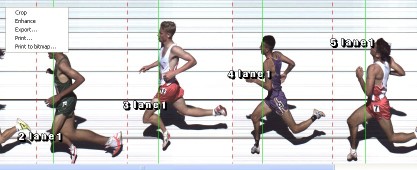
- To use the new image overlay function:
- Click Image from the Menu bar and select Overlay from the drop-down list. Then, select Text.... The Text Overlay dialog appears.
- In the Text: field, type %s to insert the corresponding lane number. You can add any text you want before or after the %s to customize it. Lane %s produces Lane 1, Lane 2, and so forth.
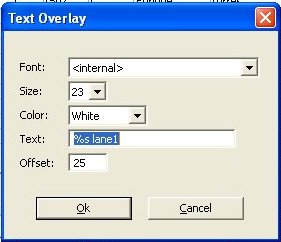
- In the Offset: text field, type a value to control how far away horizontally from the object you want the overlay placed. Otherwise, the overlay is centered vertically within the lane. The offset indicates how far away the center, not the edge, of the overlay is from the object.
Hairlines printed by default
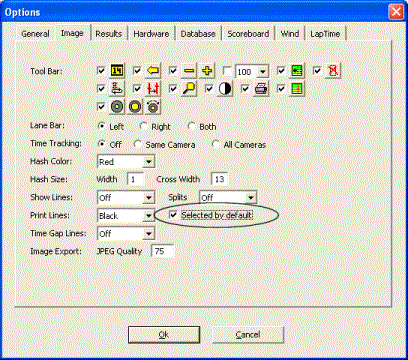
You can now configure FinishLynx so that the hairlines on the image are printed by default.
- To do this:
- Click Image from the menu bar and then select Options.... The Image | Options dialog appears.
- Click to check the Selected by default box next to Print Lines:. Now, when you print a FinishLynx image, hairlines are automatically printed.
Lane bar printouts supported
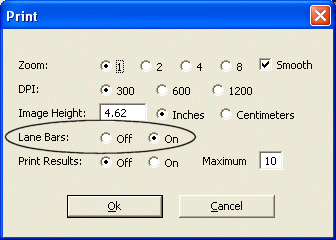
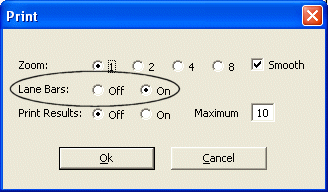
You can now print lane bars on a paper FinishLynx image printout and a bitmap FinishLynx image.
- To print lane bars on a FinishLynx image paper printout:
- Click Image from the menu bar and then select Print.... The Print dialog appears.
- Click to select the Lane Bars: On radio button.
- Click Ok.
- To print lane bars on a FinishLynx image bitmap:
- Click Image from the menu bar and select Print to bitmap.... The Print dialog appears.
- Click to select the Lane Bars: On radio button.
- Click Ok.
New printing outputs available
Now, instead of just sending a FinishLynx image to a printer, you can output a FinishLynx image to a bitmap.
You can also define the margins of a bitmap file with minimum width and height, as specified in pixels. This is particularly helpful if you are putting the FinishLynx image on a web page.
- To print the FinishLynx image to a bitmap:
- Click Image from the menu bar and select Page setup.... The Page Setup dialog appears.
- Click the Bitmap tab.
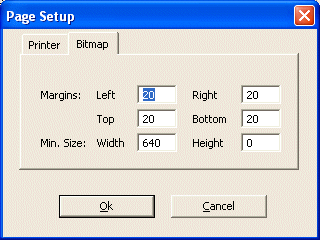
- Type values into the Margins:, Width and Height fields, and then click Ok.
- Click Image from the menu bar and select Print to bitmap.... The Print dialog appears.
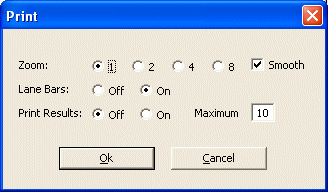
- Configure the Print dialog the way you want your bitmap to appear. Choosing a Zoom value higher than 1 makes the image larger and the resulting bitmap larger. Higher zoom levels make a very large bitmap.
- Click Ok. The Save As dialog appears.
- Select JPEG File or Targa File from the Save as type: drop-down list and then click Save. The FinishLynx image gets saved as a JPEG or Targa file.
Scoreboard Support Enhancements
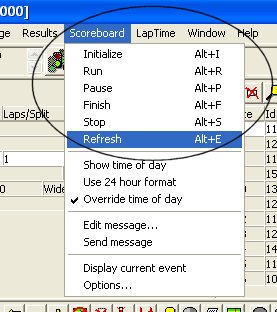
Improved scoreboard refresh
Now when you refresh the scoreboard, the paging is reset to the top of the results.
- To refresh the scoreboard:
From the main menu, click Scoreboard and then click Refresh from the drop-down list.
New scoreboard scripts
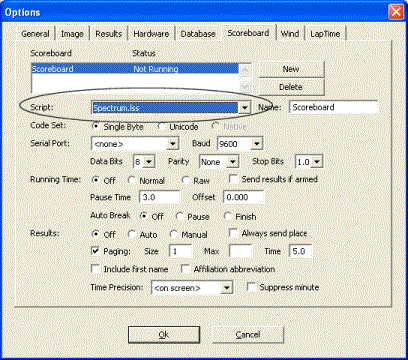
The following scoreboards are now supported by FinishLynx:
- Spectrum
- Nevco brand (four new scripts), and
- Electro brand (four new scripts).
Additionally, new Gill (GillWind.lss) and Daktronics (DakMDPWind.lss) scoreboards are also supported by new FinishLynx scripts.
- To select a scoreboard script:
- Click Scoreboard from the Menu bar and select Options.... The Scoreboard | Options dialog appears.
- From the Script: drop-down list, select the script that matches your scoreboard. FinishLynx automatically populates the remainder of your scoreboard settings.
Display to thousandths possible
There is a new variable code (\03) in the Time section of the scoreboard script that gives you thousandth precision in the running time.
This is documented in the sample scoreboard script Example2.lss. Use this new variable code in ;;TimeStopped if you want the stopped running time to display to the thousandth.
Wind Gauge Support Enhancements
Reading overlap
The wind gauge module now allows new readings to begin before the previous reading has ended, as long as your wind gauge supports that functionality.
Manually entered reading indicators
A manually entered wind reading is now indicated on the screen by a red font and on printouts with "(Manual)."
EtherLynx Camera Enhancements
Phased Light Compensation available
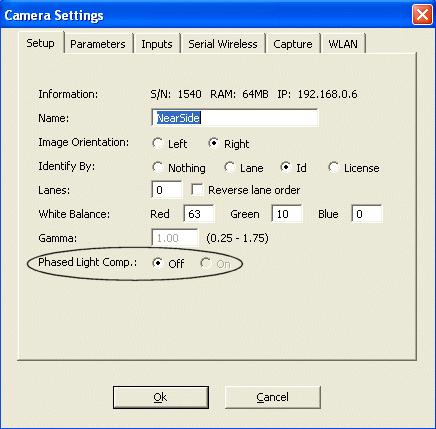
Phased Light Compensation, or PLC, has been implemented for the EtherLynx Professional (5L300) cameras. PLC reduces or eliminates the vertical dark bars in the image caused by artificial light.
- To enable the PLC setting:
- Click
 . The Camera Settings dialog appears.
- Click to select the Phased Light Comp.: On radio button.
Ordered results by non-timing EtherLynx cameras
Non-timing EtherLynx cameras can now produce ordered results from the image. Results with non-timing cameras are based strictly on order of finish.
Plug-in Enhancements
New Time Trial Plug-in (LPTT)
The new Time Trial Plug-in, referred to as LPTT, allows you to create events as time trials, meaning that they will contain more than one start.
Enabling Time Trial Mode
To turn Time Trial Mode on in FinishLynx:
- Click File from the Menu bar and then select Options.... The Options dialog appears.
- Click the General tab.
- Next to Time Trial Mode:, click to select the On radio button.
- Click Ok. The Time Trial Mode is now enabled.
Deleting a start in a time trial event
Follow these steps to delete a start in a time trial event:
- Click to select the start that you want to delete.
- Click Event from the Menu bar and then select Delete object. The start is deleted from the event.
Using the "Set current start" feature
In Time Trial Mode, you can set the current start for the purposes of on-screen running time, scoreboard running time, and LapTime event generation.
- To set the current start:
Click Event from the main Menu and then select Set current start.
Using Time Trial Plug-in with LapTime Plug-in
When the Time Trial Plug-in is installed along with the LapTime Plug-in, you have an additional LapTime Type option called From Photo Eye. This feature means that when a photo eye break is processed by the scoreboard, causing the running time to pause or stop, then a LapTime event is generated with the Id of the current start and the time of the break.
When using this feature, you will set the Sync. Source to None. This means that the break time is stored in time of day, and the associated start is subtracted as appropriate. This allows the start to be changed later and have the change reflected in the LapTime data.
- To enable the From Photo Eye feature:
Follow these configuration steps to enable the From Photo Eye feature.
- Click LapTime from the Menu bar and then select Options.... The LapTime | Options dialog appears.
- Click the Key drop-down list near the bottom of the dialog and select Id.
- Next to the Sync. Source: radio button, click to select None.
- Click Ok.
Using the Time Trial Plug-in with templates
If a time trial event is used as a template, then the new event is also a time trial event, even if Time Trial Mode is currently off in the Options dialog.
Notes about Time Trial Mode
Time trial events have an additional line in the Information Zone labeled Time Trial. This line lists the number of starts in the event. Start lines in a time trial event are indented, and the indent region is yellow, to mark the current start.
Start lines in a time trial event include an Id field used to match the start to a result object.
Time trial events remain armed, even when a start is added. A time trial event must be manually disarmed with the new disarm function see "Ability to disarm an armed event" when all starts have been received.
When a start is received, its Id value is automatically filled in with the currently selected result's Id value, and the next result line is selected. If there are no results (no start list), then the Id value in the start is left blank. You can directly edit the start's Id value at any time.
The times in image areas are always displayed in time of day.
The times in the results area are based on an individual result object's associated start time (as matched by Id value). If no start matches by Id, then the first start is used. This behavior can still be overridden by the results filters. When a filter matches a result, it first looks for a start matching by Id value and, if not found, will use the start selected by that filter.
New LapTime resend function
There is a LapTime resend function that works only for AMB decoders. It resends all stored passings for a specific decoder.
- To enable the LapTime resend function:
Click LapTime from the Menu bar and then select Resend. A drop-down list appears allowing you to choose which data is to be resent.
New LapTime devices supported
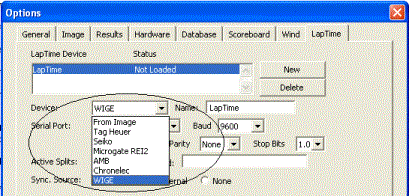
Support has been added for the Chronelec and WIGE LapTime devices.
- To select a LapTime device:
- Click LapTime from the Menu bar and then select Options.... The LapTime | Options dialog appears.
- Click New to enable the LapTime device function.
- Click the Device: drop-down list and then click to select the LapTimer device you are using. FinishLynx automatically populates the remainder of the settings for the device you selected.
Built-in Multiple Region Enhancement
Multiple Region Enhancement, or MRE, is now included with FinishLynx rather than being available as a separately purchased plug-in.
- About MRE:
In some lighting conditions, the finish line may contain well-lit and significantly darker areas, for example, when a shadow falls across a portion of the finish line.
With the MRE feature, you can define specific areas of the field of view for electronic enhancement, allowing you to pull viable image from the darker areas. Like the standard enhancement feature, the enhancement can easily be undone, even after the image is saved.
RadioLynx replaces Serial Wireless
In FinishLynx 6.0, the term RadioLynx replaces the term Serial Wireless.
The new RadioLynx Plug-in is referred to as the LPRL Plug-in. It replaces the old Serial Wireless, or LPSW Plug-in. The functionality of the new RadioLynx Plug-in is the same as the old Serial Wireless Plug-in. However, if you are using the old LPSW Plug-in, then in FinishLynx 6.0, all previous references to Serial Wireless are replaced with RadioLynx.
