FinishLynx 7.00 Release Notes
This chapter describes new features available in FinishLynx 7.00, since the release of FinishLynx 6.00.
General New Features
Synchronize TOD feature (new)
There is a new feature called Synchronize TOD.... You can use this to synchronize the EtherLynx camera Time Of Day time to another source. You tell FinishLynx what time it should have been when a certain event occurred; for example, a start signal or an image frame time.
- To access the Synchronize TOD feature:
- Click to select Event from the Menu bar.
- Click to select Synchronize TOD.... A dialog appears.
- If you are synchronizing to a start signal, select the start in the main toolbar and then run Synchronize TOD.
- If you are synchronizing to an image, then you need to:
- Create an event.
- Capture image.
- Select the frame to synchronize to.
- Run Synchronize TOD.
When a start and image synchronized source are both present, you can choose which you want to use in the dialog box. Once Synchronize TOD is run, all previously received starts are removed, and all previously capturable events are not capturable.
|
NOTE: Note to NASCAR version users: This is an enhanced version of the Set Timer... command, which is no longer available.
|
High COM port numbers now supported
High COM port numbers are now supported. FinishLynx is now able to access ports up to COM16, and also looks for non-contiguous ports, up to COM128.
Ability to override default start sound
You can override the default start sound by putting a FinishLynxStart.wav file in your FinishLynx directory.
New full screen two mode
There is a new Full screen two mode that displays two images at once.
- Accessing Full screen two mode:
Click Image from the Menu bar, and then click to select Full screen mode two. Both images appear, separated by a default barrier.
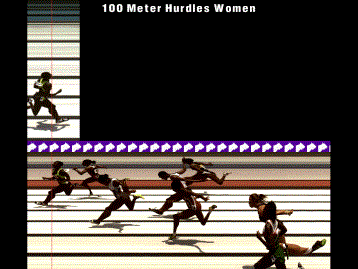
When using this mode, the primary, or bottom, image is chosen. This is the current, or last selected, image pane. The secondary, or top, image is the first image found that is not the primary image.
The secondary image is displayed at a zoom level that matches its frame rate to that of the primary image, so that objects in both images will be the same width. The hash line in the secondary image is displayed at the same time as the hash line in the primary image. Also, the secondary image is shifted horizontally, so that the hairlines line up.
Each image is allocated vertical screen real estate, proportional to its height. There is a special file, FullScreen.tga, which, if present in the Lynx directory, is drawn repeatedly across the screen where the two images meet. The FinishLynx installer includes a sample FullScreen.tga, but can be replaced with any file, or deleted if you do not want any banner displayed.
- Controlling images in full screen mode:
Once full screen mode is active, you can control various aspects of the display.
- The arrow keys move the images left, right, up, and down.
- Holding down the 1 key while subsequently holding down an arrow key moves the top image only.
- Holding down the 2 key while subsequently holding down an arrow key moves the bottom image only.
- Holding down the 0 key allows you to again control both images.
- Press the PgUp and PgDn (page up and page down) keys to move the separation between the two images, giving more space to one and less to the other, if both images do not fit entirely on screen vertically.
- To exit full screen mode:
- Press the Esc (escape) key.
New Image: Set sub-menu
Set is a new sub-menu in the Image menu. It allows you to access several image options, including:
- Set white balance, and
- Set photo eye balance, etc.
- To access the Set sub-menu:
- Click Image from the menu bar and then select Set. The Set sub-menu appears.
New Open recent feature
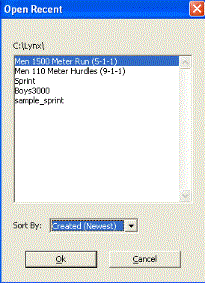
Click File from the Menu bar and then click to select Open recent.... A dialog opens that lists the events in the current directory, and allows you to sort by:
- name [Name (A to Z) or Name (Z to A)]
- creation time [Created (Oldest) or Created (Newest)], or
- modification time [Changed (Oldest) or Changed (Newest)].
Delta time field uses cumulative split time
The Delta time field now uses the cumulative split time, until at least one result has an official time.
Options dialog has changed
The File | Options... dialog has changed as follows:
- The Hardware tab has been eliminated. The options that were available on the Hardware tab have been moved to the General tab.
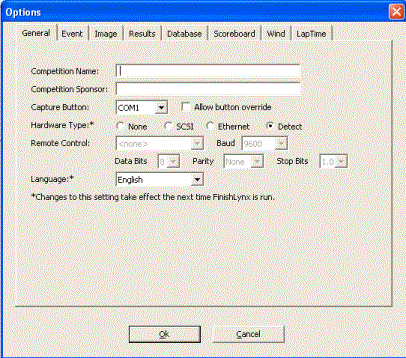
- A new Event tab contains all of the settings on the General tab that are event-related.
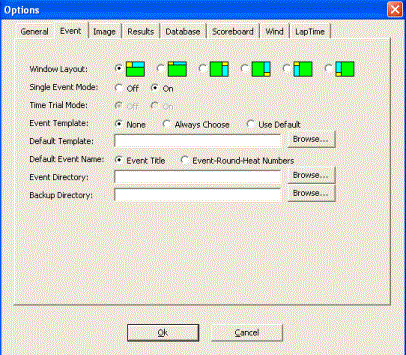
New Event tab setting
Access the Options... dialog and then click the new Event tab.
You can now control the arrangement of the event window. The default choice is the standard FinishLynx layout, and there are five alternate choices. 
New Language Files
German language file updated
The German language file has been updated.
- To use the German language file setting:
- Click File | Options.... The Options dialog appears.
- Click to select German from the Language: drop-down list at the bottom of the dialog.
- Close FinishLynx. The next time that you run FinishLynx, it displays using the German language file that you just selected.
New Russian language file added
A new Russian language file has been added.
- To use the Russian language file setting:
- Click File | Options.... The Options dialog appears.
- Click to select Russian from the Language: drop-down list at the bottom of the dialog.
- Close FinishLynx. The next time that you run FinishLynx, it displays using the Russian language file that you just selected.
Photo Eye Enhancements
Second photo eye input supported
FinishLynx now supports the second photo eye input on the EtherLynx 5L100, 5L200, and 5L300 (EtherLynx Professional) cameras. This allows you to use any combination of both external photo eyes, and the internal photo eye.
- The photo eye masking feature in the Scoreboard menu also gives separate access to each of these photo eyes.
- Photo eye capture still uses the original photo eye input, which is now called the External A photo eye.
New photo eye capture method
There is a new photo eye capture method, allowing you to simply select all of the capture methods that you want active, including:
- Manual
- Timed
- Automatic, and/or
- Photo Eye.
- To activate the Manual and Automatic capture methods:
- Click
 . The Camera Settings dialog appears.
- Click the Capture tab.
- Click to check Manual and Automatic.
- To activate the Timed capture method:
- Click
 . The Camera Settings dialog appears.
- Click to uncheck all options to activate the Timed capture selection, and then click to check Timed capture.
- About the new Photo Eye capture method:
The new Photo Eye capture can be combined with Automatic and/or Manual captures, if you want. When the photo eye beam is broken, capture starts the Leader frames before the current frame. When the beam ceases to be broken, capture stops the Trailer frames after the current frame.
Photo eye capture allowed without ACM Plug-in
Photo eye capture is now allowed without the ACM Plug-in installed.
Ability to use photo eye as gun signal
Now, selecting Internal for the Gun Sensor uses the virtual photo eye as your gun signal.
When set to Internal, the values set in the photo eye area are used for threshold, top, bottom, size, and mask. The photo eye offset is not used; however, the gun sensor offset, if set, is used.
If you have Gun Sensor set to Internal, then all applicable fields, even those in the photo eye area, are enabled, even if you disable all photo eye sources.
Scoreboard Enhancements
Two new Nevco scripts
The previous four Nevco scripts are replaced with two new ones:
- Nevco_123.lss and
- Nevco_860.lss.
- To select a new scoreboard script:
- Click Scoreboard | Options... from the Menu bar. The Scoreboard | Options dialog appears.
- Click the New button to activate the Scoreboard settings.
- From the Script: drop-down list, click to select a scoreboard script. FinishLynx automatically populates the settings for that dialog.
- Click Ok.
New Daktronics script
A new Daktronics script, Powertime.lss, has been added.
- To select a new scoreboard script:
- Click Scoreboard | Options... from the Menu bar. The Scoreboard | Options dialog appears.
- Click the New button to activate the Scoreboard settings.
- From the Script: drop-down list, click to select a scoreboard script. FinishLynx automatically populates the settings for that dialog.
- Click Ok.
Fixed width font option available
By default, the Scoreboard Message dialog now has a checkbox that is selected so that text is displayed in a fixed width font.
If you want to send a scoreboard message in a language that is not part of a fixed width font, such as Japanese, Korean, Chinese, Arabic, or Russian, click to uncheck that option.
- To access the Scoreboard Message dialog:
Click Scoreboard from the Menu bar, and then select Edit message.... The Scoreboard Message dialog appears. The Use Fixed Width Font checkbox is at the lower left corner of the dialog.
TimeNoDelay now set per scoreboard
TimeNoDelay is now set per-scoreboard rather than globally.
Instead of setting \Scoreboards\TimeNoDelay, you now need to set \Scoreboards\n\TimeNoDelay, where n is the scoreboard number, for each scoreboard that you do not want to use the default value of 1.
TimeArmed and TimePaused features supported
Scoreboard scripts now support two new sections, TimeArmed and TimePaused.
TimeArmed reverts to TimeRunning if not present, and TimePaused reverts to TimeStopped if not present.
These new sections allow greater flexibility in choosing what to send when, and are particularly helpful when triggering objects to appear in ResulTV.
- Example of application of new scoreboard script sections:
If you want to trigger a logo to appear when the race is over, but not when displaying intermediate times, you can use separate TimePaused and TimeStopped sections. Each section sends the same data, but only the TimeStopped section includes the command to trigger the ResulTV object to appear.
Stop on-screen time option available
There is a new option in the Scoreboard drop-down list, Stop on-screen time, that, if selected, causes the on-screen running time to stop when the scoreboard is in either Paused or Finished mode.
- To access Stop on-screen time:
- Click Scoreboard from the Menu bar.
- Click to select Stop on-screen time.
Wind Gauge Enhancements
New script added
ERATON_wind.lss is included, which works with any of the FinishLynx supported wind gauges.
Manually entered wind readings appear in LIF file
Manually entered wind readings are now indicated in the LIF file by "(Manual)" appearing after the wind value, in the same field.
This string is found in \Strings\Database\LIF\WindManual. You can disable this feature by setting the value to an empty string.
Seiko Timing PC wind gauge improvements
The Seiko Timing PC wind gauge works with the Seiko data simulator.
Additionally, the Seiko Timing PC wind gauge reads the reaction time data that is part of the data stream. When the reaction time data is received, it is inserted into the current event.
- To configure FinishLynx's wind gauge settings:
- Click File from the Menu bar and then select Options.... The Options dialog appears.
- Click the Wind tab to display the Wind dialog.
- Click Wind Module:* and then select the wind gauge from the drop-down list. FinishLynx is automatically populated with the settings for the wind gauge that you selected from the list.
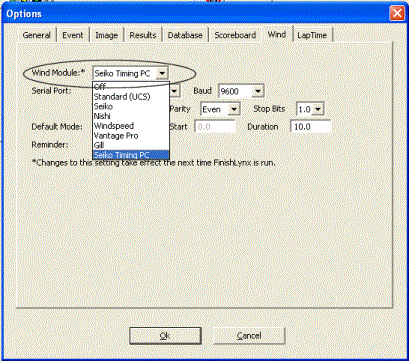
- Click Ok and then restart FinishLynx.
LapTime Enhancements
New LapTime devices supported
Selecting a LapTime device
- Click File from the Menu bar and then select Options.... The Options dialog appears.
- Click the LapTime tab. The LapTime dialog appears.
- Click the New button to activate a LapTime device.
- Click Device: to display a drop-down list with available LapTime devices.
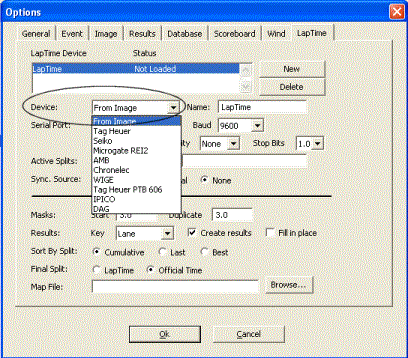
- Click to select a device from the list. FinishLynx is automatically populated with the LapTime device's correct settings.
- Click Ok to return to the FinishLynx main screen.
IPICO LapTime device
A new LapTime device, IPICO, is supported.
There is a hidden setting, \LapTime\IPICO\Suffix, that defines which kind of IPICO event FinishLynx uses.
- The default is LS, for Last Seen.
- It can also be FS, for First Seen.
Tag Heuer PTB 606 LapTime device
Support for the Tag Heuer PTB 606 LapTimer has been added.
There are now separate options for the Tag Heuer PTB 605 and for the Tag Heuer PTB 606.
DAG LapTime device
A new LapTime device, DAG, is supported.
Ability to use manual start with any LapTime device
You can now use manual start with any LapTime device. To configure any LapTime device to use a manual start:
- Click File from the Menu bar and then select Options.... The Options dialogue appears, with the General tab dialogue displayed by default.
- From Hardware Type:*, click to select the None radio button.
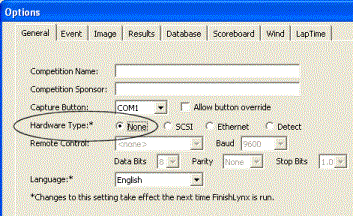
- Click the LapTime tab. The LapTime dialogue appears.
- From Sync. Source:, click to select the None radio button.
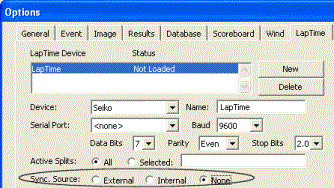
- Click Ok to return to the FinishLynx main screen.
Ability for final split to go into results time field
You can now set the hidden setting \LapTime\FillInTime to a value of 2 to have the final split time always go into the results time field, even when using an EtherLynx camera.
- A value of 1, still the default, does this only when Hardware Type is set to None.
- A value of 0 never does it.
New hidden settings for AMB LapTime devices
There are two new hidden settings for AMB LapTime devices:
- \LapTime\AMB\IdField, and
- \LapTime\AMB\IdStrip.
The IdField value specifies which field in the record should be used by FinishLynx to identify the tag. The default is 3, which is the "internal" ID that has always been used. This can be changed to 8 to use the "external" ID printed on the outside of tags.
The IdStrip value is a string of characters that are removed from the ID string. This defaults to an empty string, as the "internal" ID has no characters that should be stripped.
EtherLynx Camera Additions and Enhancements
Introducing the new EtherLynx Fusion camera
FinishLynx supports the new EtherLynx Fusion camera, 5L400.
Rate and Height fields show max value
The rate and height fields in the Hardware Control Window now show the maximum allowed value.
This is mainly for the benefit of the new EtherLynx Fusion 5L400 camera, since the max rate and height are interdependent.
Full sensor resolution now supported
The full sensor resolution is now supported in the EtherLynx Professional 5L300 zoom modes.
- Rather than 2000 in Zoom 150, you can use 2038 pixels.
- Rather than 4000 in Zoom 300, you can use 4078 pixels.
Frame Offset Option available in EtherLynx Professional
A new Hardware Option, 5LFO, or Frame Offset Option, is available for optional purchase to use with the EtherLynx Professional 5L300 camera.
5LF0 allows the active area of the sensor to be arbitrarily chosen, rather than always centered. You can specify this offset in the camera dialog using the new Frame Offset setting, just below the Frame Height setting.
For an EtherLynx Professional 5L300 camera with 5LF0 installed, select Custom and type in any valid value. When Custom is selected, a range appears showing the legal values.
An alternate way of setting the offset and height is by taking a picture, selecting the vertical portion of the image that you want to capture, and then selecting the new Image | Set | Capture area function.
It is not legal to change the offset and height of a camera in an event after capture has occurred. Therefore, the changes are made to the Hardware Control Window camera object and the current event is closed. If the event was not saved, you are warned to that effect. The event is closed automatically, because if you enable capture again for that event, the new offset and height settings are suppressed, with the old ones still present in the event.
